Adding intro and exit 'bumpers' to a video help viewers know what to expect, but it can be a very lengthy manual process. This demo application automates the process for you.
Doug Sillars
October 11, 2021
Video bumpers are small video intro and exit scenes added to a video to help the viewer understand what they are about to watch. The intro 'bumper' often has a title or description of the video that is to follow, and the outro 'bumper' provides a call to action on what the viewer can do next - now that they have watched the video.
At api.video, we add bumpers to many of our videos to provide context and a subject for each video, and the end bumper provides a 'call to action' after the video has been watched.
Adding bumpers to your video makes your video appear more polished, as an editing step was taken to add these to the raw video you recorded with your camera (or screen sharing tool). It is often a manual task in your video editing software.
In this post, we'll automate the task of adding bumpers to a video recording. We'll use the Shotstack API to add the bumper image and text titles to the front and end of a recorded video. The completed video will then be uploaded to api.video, and be ready to play in seconds - removing several manual steps from the creation of your training videos!
You can also check out the API reference documentation for the endpoints used for this project:
Create slides in Google Slides for the intro & outro
Take screenshots of the slides
Import the screenshots into iMovie
Add them to the video timeline
Encode the video
Upload the video to api.video
The downsides to this:
Steps 1-4 are all manual, and are repeated for each video that I create.
In steps 5&6 there is a lot of waiting.
The "new way": bumper.a.video
Add images, text and video to a web form. Click "upload." The video will upload and have the bumpers added automatically - with no manual work, and (what seems like) a lot less waiting.
Background image: a 16:9 image suitable for the background
Watermark image. In this demo, we'll use the api.video logo. It is sized to 100x100 pixels to fit properly on the video. The image is also transparent to ensure that there is no white "background" on top of the video.
A video
4 Text fields
Intro title
Intro 2nd title
Outro title
Outro 2nd title
The tools used in this demo
Shotstack
The Shotstack API is a video editing API. You can splice together videos, add watermarks, and add text into your video using their API. We'll use this API to create our bumpers:
Upload a background image (we use the same image for both bumpers)
Add a title and a 2nd title for both bumpers (text fields)
Add a watermark in the upper right corner for the entire video.
api.video
The initial video will be uploaded to api.video. Once the mp4 has been produced, it is sent to Shotstack for 'bumper work.' Once the video with bumpers has been created via the Shotstack API, we will re-add the completed video to api.video, and provide a playback url.
Creating the video
Once you hit 'send' on the form at bumper.a.video, a lot of action takes place:
The 2 images are uploaded to bumper.a.video/images. Shotstack requires that the images be publically available on the internet for the api to process them.
The video is uploaded to api.video. For security reasons there are a few steps in this process:
The node server makes 2 calls to api.video: creating a delegated token and a videoId (with the name & description provided by the user).
A delegated token works as a public API token for upload only.
Sending this and the videoID back to the browser, we can use the api.video JavaScript uploader to securely upload the video to api.video.
Once the video is uploaded - a message appears to the user, and a button appears to update the status of the processing.
Now that the video has been uploaded to api.video, the rest of the work is done between the Node server, api.video and Shotstack.
Shotstack requires a publically available video URL for processing the video. We use the video.encoding.quality.completedwebhook to monitor the creation of the videos at api.video. When the webhook alert tells us that the mp4 version of the video has been created, we know that the mp4 file is ready. Now we can request the api for the URL of the mp4 (to send to Shotstack).
In order to build the bumpers correctly, we also need the duration of the video uploaded. The video status endpoint tells us the duration of the video in the metadata section of the response.
Creating the call to Shotstack
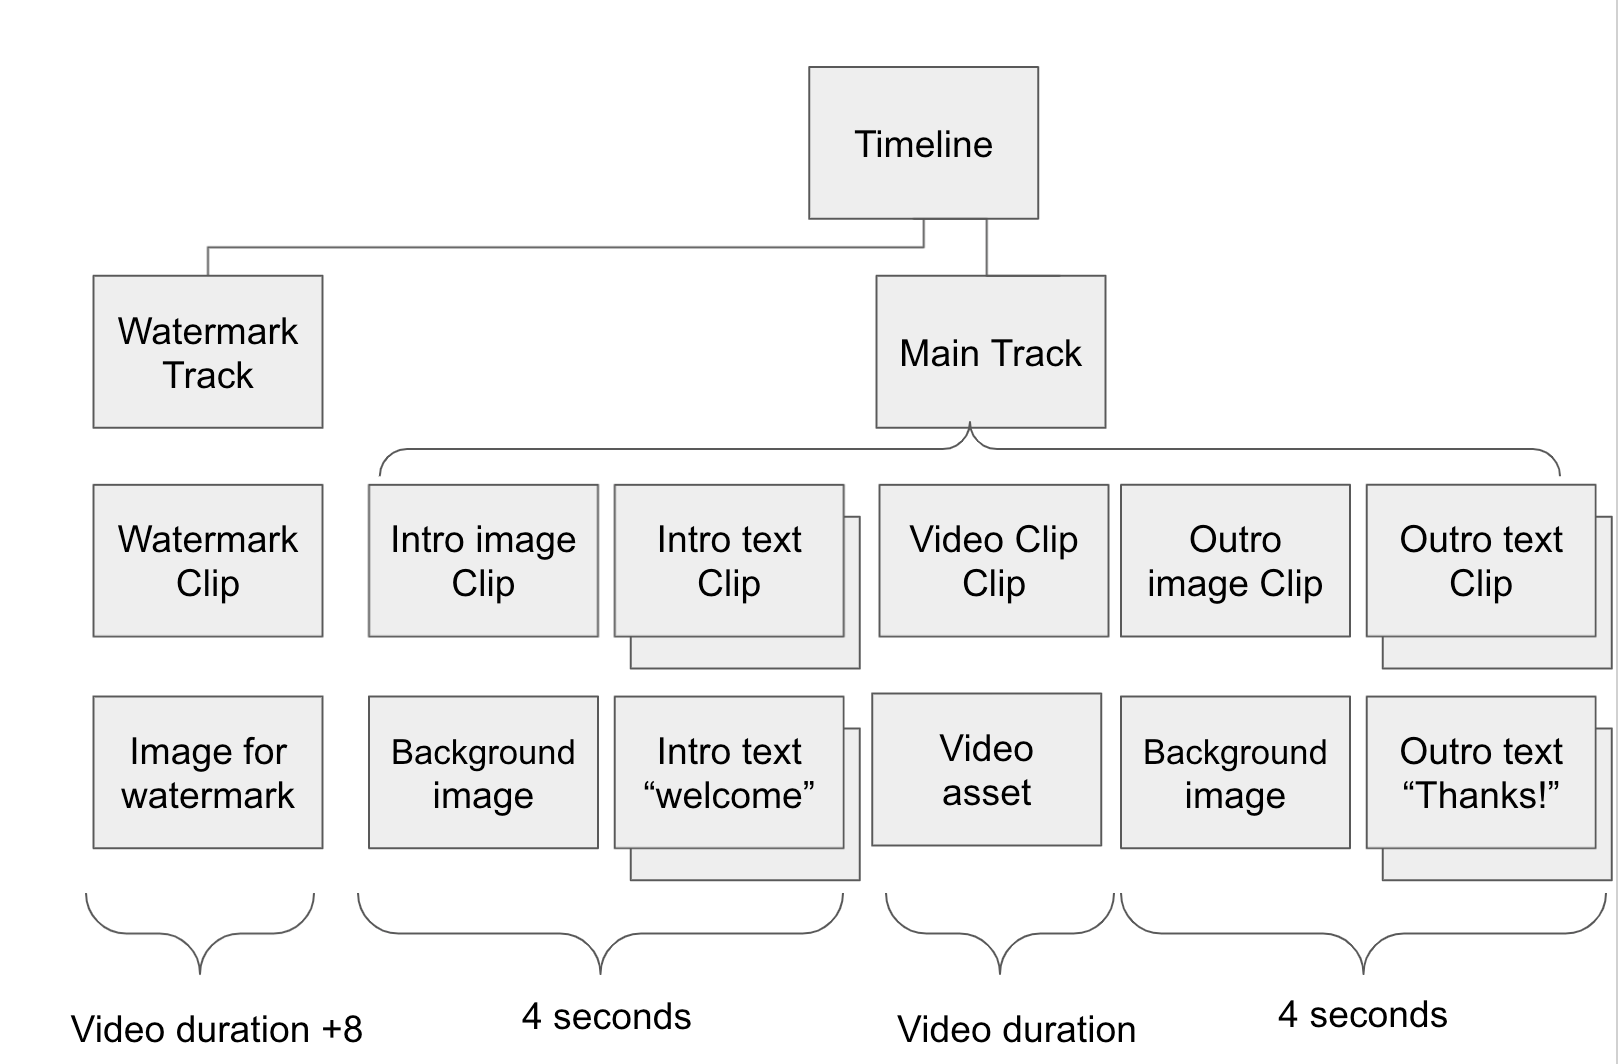
The Shotstack API works like an onion with many layers that must be defined to create a full video:
Every video has a timeline that defines the overall video.
Each timeline has one or more tracks. Tracks sit atop one another (in our case, we will have a watermark track sitting atop the video track).
Each track has one or more clips. The clips are bits of video/text or images that have specific durations inside the track.
Each clip has an asset that defines the clip - this could be a string of text, or an image or a video file.
There are two tracks that play the length of the video - the watermark track - which has a single clip for the single image asset.
the code for this (using the NodeJS SDK) looks like this:
let watermarkAsset = new Shotstack.ImageAsset;
							watermarkAsset.setSrc('https://bumper.a.video/images/'+wmpath)
						//watermark to run full video
						let watermarkClip = new Shotstack.Clip;
							watermarkClip.setAsset(watermarkAsset);
							watermarkClip.setPosition("topLeft");
							watermarkClip.setOffset({"x": 0.05,"y": -0.05});
							watermarkClip.setOpacity(0.5);
							watermarkClip.setFit("none");
							watermarkClip.setStart(0);
							watermarkClip.setLength(4+duration+4);
The clip is used to set the location - in this case the top left - with a bit of (x,y) adjustment, the opacity (50%), and how long the clip should play.
Since the intro and outro are 4 seconds, and the video has length duration - we set this clip to appear for the entire video.
The main track of the video has many clips (and assets). Both the intro and outro have background and 2 text assets each, and the middle section has just the video clip/asset.
Shotstack does not like having clips with identical times. That means I cannot add the titles at the same moment as the background image. I could have perhaps placed the text items into different tracks to overlay the background - and then had them all start at the same time. Instead I have the background appear, and then add each bit of text every 100ms:
						let titleIntroTextAsset =new Shotstack.TitleAsset;
							titleIntroTextAsset.setText(introTitle);
							titleIntroTextAsset.setStyle('chunk');
							titleIntroTextAsset.setColor('#ffffff');
							titleIntroTextAsset.setSize('x-large');
							titleIntroTextAsset.setPosition('center');
						let titleIntroClip = new Shotstack.Clip;
							titleIntroClip.setAsset(titleIntroTextAsset);
							titleIntroClip.setStart(0.1);
							titleIntroClip.setLength(3.9);

						let titleIntroTextAsset2 =new Shotstack.TitleAsset;
							titleIntroTextAsset2.setText(introTitle2);
							titleIntroTextAsset2.setStyle('chunk');
							titleIntroTextAsset2.setColor('#ffffff');
							titleIntroTextAsset2.setSize('large');
							titleIntroTextAsset2.setPosition('bottom');
						let titleIntroClip2 = new Shotstack.Clip;
							titleIntroClip2.setAsset(titleIntroTextAsset2);
							titleIntroClip2.setStart(0.2);
							titleIntroClip2.setLength(3.8);
The main text asset is present from 100ms into the video to 3.9s, and the secondary text asset is present from 200ms to 3.8s. It looks kind of cool, as if they are boomeranging in and out, so I kept it this way.
The video clip in the middle has the volume set to 50%. It starts at 4s, and has a length of duration seconds.
						let videoAsset = new Shotstack.VideoAsset;
							videoAsset.setSrc(mp4Url);
							videoAsset.setVolume(0.5);
						let videoClip =  new Shotstack.Clip;
							videoClip.setAsset(videoAsset);
							videoClip.setStart(4);
							videoClip.setLength(duration);
All of this data is sent to the Shotstack API, and it begins processing the video - adding the watermark and the bumpers.
Once the video is completed (the Node server polls every 2s to get an update), a new video at api.video is created, using the source URL from Shotstack:
	function updateApiVideo(url){
							//ok so the video is created at Stostack
							const videoCreationPayload = {
								title: title, // The title of your new video.
								description: descr, // A brief description of your video.
								source: url, // If you add a video already on the web, this is where you enter the url for the video.

							};
							finalUpload =  client.videos.create(videoCreationPayload);
							finalUpload.then (function(finalVideo) {
								console.log(finalVideo);
								var finalvideoId = finalVideo.videoId;
								var finalPlayerURL = finalVideo.assets.player;
								console.log('finalvideoid',finalvideoId);
								console.log('finalPlayerURL',finalPlayerURL);
								//res.send(finalPlayerURL);
								videoProgressJson.finalVideoId = finalvideoId;
								videoProgressJson.finalPlayerURL = finalPlayerURL;
								videoStatus(videocreationList, videoId);


							});
						}
Finally - we use the same video encoding webhook we used earlier to wait until the 720p version of the video is ready for playback (looking for the new videoID, and the HLS version at 720p resolution).
The user - back on the webpage, can click the "update status" button and track this process. The update status reports:
Initial mp4 created
Shotstack id
Shotstack status
New api.video videoID
Final video at 720p
When the last item reports true - we add a link and embed the new video right onto the bumper.a.video page.
Conclusion
Automating the mundane tasks we run regularly makes life easier. In this demo, I identified a process that was very manual - creating video bumpers for demo videos. I used api.video and Shotstack.io to automate the process, and thereby making the creation of video demos faster and easier!
If you have any questions or suggestions, please share them on our community forum. If you still need to create your api.video account, you can do that in just a few moments by following this link. Happy building!