Video trends · 6 min read
How to migrate from Azure Media Services to api.video

How to migrate from Azure Media Services to api.video

Azure Media Services is closing operations in June 2024 and the best alternative you have is to migrate to api.video. Read the blog to know the details of the migration.

Artem Matinian

July 12, 2023

With the upcoming retirement of Azure Media Services in mid-2024, you may be wondering about what to do next. But worry not, because we have a better and a far more affordable option for you! In this article, we will discuss seamless migration options from Azure to api.video, give you reasons as to why you should be doing it, and also explain to you a simplified process to execute the migration.


Let’s get started.

Why should I migrate from Azure Media Services to api.video?

First things first, why should you think about migrating to api.video? What is the benefit? How is it better?


Well, let me answer all these questions with some solid facts.

1. api.video charges you zero cost for adaptive bitrate encoding

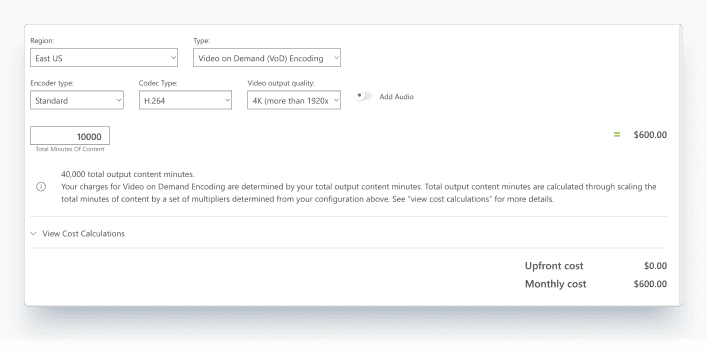
Let’s understand this with an example where we compare the encoding of 10,000 minutes at 4K resolution.


Azure takes $600 to encode a video of 10,000 minutes at a 4K resolution as you can see in the image below (source: Azure Pricing Calculator).

Azure Media Services Pricing

On the other hand, api.video takes ZERO cost to encode your videos. Yes, encoding is completely free with api.video, whether it is 10,000 minutes of video or 20,000; 480p resolution or 4K – it is absolutely free.


Check our pricing calculator to learn more about our pricing.

api.video Pricing

2. Ingestion speed with api.video is way better than that with Azure.

Let’s understand this by uploading and transcoding the same 18.7Mb file to Azure and api.video.


When you transcode a video with Azure, the time it takes to do the job is 1 minutes and 13 seconds. Note that this is just time taken for transcoding, and I have not yet included the upload time here.

Azure Media Services transcoding time

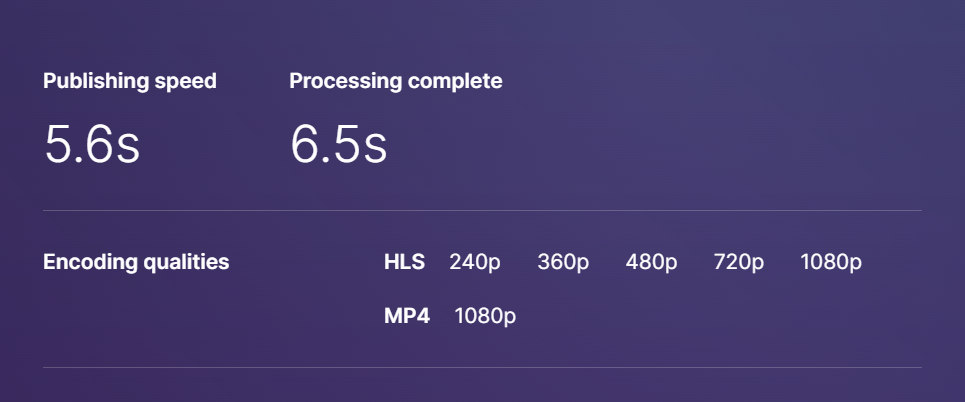
When you upload and transcode the same video with api.video, the time it takes to do the job is JUST 30 seconds.

encoding speed

Publishing and processing time of a video at api.video

3. Ease of use of api.video surpasses that of Azure

The process to upload, encode and transcode videos at Azure is complex and often tedious to execute. api.video, on the other hand, has built an interface and documentation that is easy to understand and quick to execute. To validate what we claim, do give the below mentioned links a read and know it for yourself. 🙂


Sounds good? If yes, then let’s move to the actual migration steps.

Migration steps to move from Azure to api.video

If you’ve made up your mind to make the shift, let’s understand the migration steps involved in it to move all your data from Azure Media Services to api.video.

You can also migrate your videos directly through our Import Tool.


Here's a quick video explaining how to navigate through the Import Tool.

To start with the migration steps, let us look at a ready script in Node.js for you to follow. Before you start the script, make sure you clone the Azure Media Service to api.video migration [script] from (https://github.com/apivideo/azure-media-services-api-video-migration) Github. Once you do that, you can follow the guide below.


Let’s understand what the script is doing.


  1. The script will check for all assets in your Azure Media Service Instance
  2. It will get the Storage containers and list the blobs for these storage containers
  3. Because of the way Azure is encoding their videos, the script will take the file with the highest resolution (in order not to duplicate the files)
  4. Once it gets the list, it will create a video object with the name same as the blob and set the source to the Azure storage URL
  5. The file will then be uploaded and encoded with api.video


You can also navigate to the api.video documentation to get more information about how each endpoint works. You can also check the api.video api reference or the api.video guides for more details.


Note that the script does not automatically delete the files from your Azure Storage or Azure Media Services, you will have to do that manually. If you wish to keep the sources on Azure Account Storage as backup, you are also welcome to do so.

Using the migration script

Here are the steps to use the script to migrate from Azure to api.video.


  1. First, import the modules that are needed, such as:
  • @api.video/nodejs-client - api.video node.js client, in order to create the video object, upload and encode the video
  • @azure/identity - access Azure services
  • @azure/arm-mediaservices - client to access Azure media services


  1. Next, pass in credentials that you get from Azure Media Services to the client and the api.video client


javascript

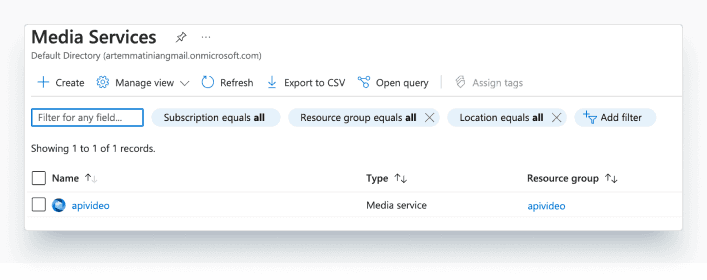
  1. Note that in the previous step, you will also need to update the .env file and grab the parameters from Azure. In order to do that, navigate to your Azure Media Service, and select the directory that you would like to migrate.
Azure Media Services migration directory
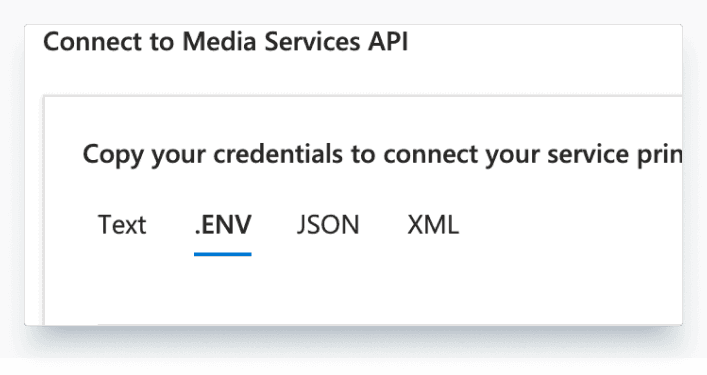
  1. Select API keys and copy over the parameters presented in the .ENV pane (you can select either User Authentication or Service principal authentication)

Azure Media Services API Access & Assets
Connect to Azure Media Services API
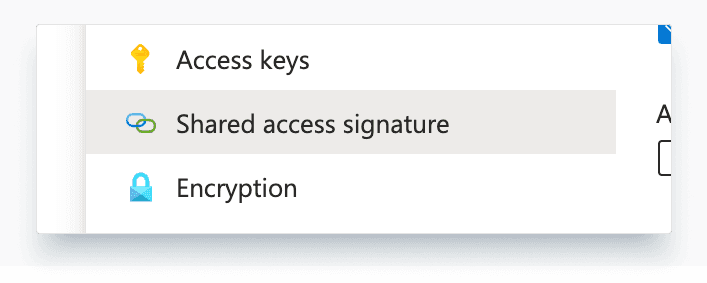
  1. Next, to get access to the storage, navigate to the Azure Storage AccountShared access signature:
Azure Media Services Shared Access Signature
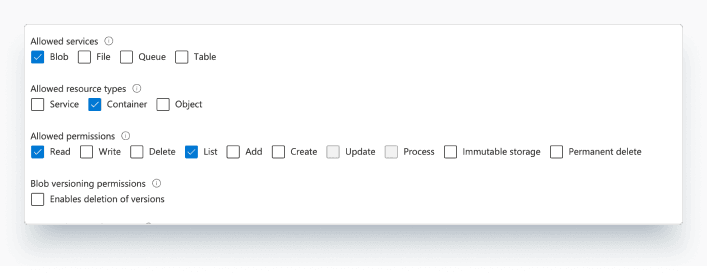
  1. Allow the following:
Azure Media Services permissions
  1. Make sure that you generate the Shared access signature and once you have the links, copy the Blob service SAS URL link to the .env file. The parameter you are looking for is REMOTESTORAGEACCOUNTSAS
Azure Media Services Blob Service SAS URL
  1. Add the api.video API key to the .env file by navigating to the api.video dashboard and copy the API key value
api.video API key from the Dashboard
  1. Now, run npm install in the terminal in order to install all of the node modules
  2. Run npm run build
  3. Run npm run start in order to start the migration script
  4. Sit back and relax 🙂

Conclusion

Well, that was it! Yes, it was that simple.


We hope that you choose wisely as you weigh the strengths of Azure and api.video. However, if you consider factors like scalability, customization options, pricing, and developer friendly API, api.video comes out to be a clear winner.


If you still have any questions regarding the migration, book a call with us — we are here to help you. Or sign-up for a free sandbox account to test us out for free.


So, are you ready to make your life easier with this painless migration process?

Try out more than 80 features for free

Access all the features for as long as you need.
No commitment or credit card required

Video API, simplified

Fully customizable API to manage everything video. From encoding to delivery, in minutes.

Built for Speed

The fastest video encoding platform. Serve your users globally with 140+ points of presence. 

Let end-users upload videos

Finally, an API that allows your end-users to upload videos and start live streams in a few clicks.

Affordable

Volume discounts and usage-based pricing to ensure you don’t exceed your budget.