Tutorials · 9 min read
A very Brady video: Using FFMPEG to recreate the Brady Bunch introduction
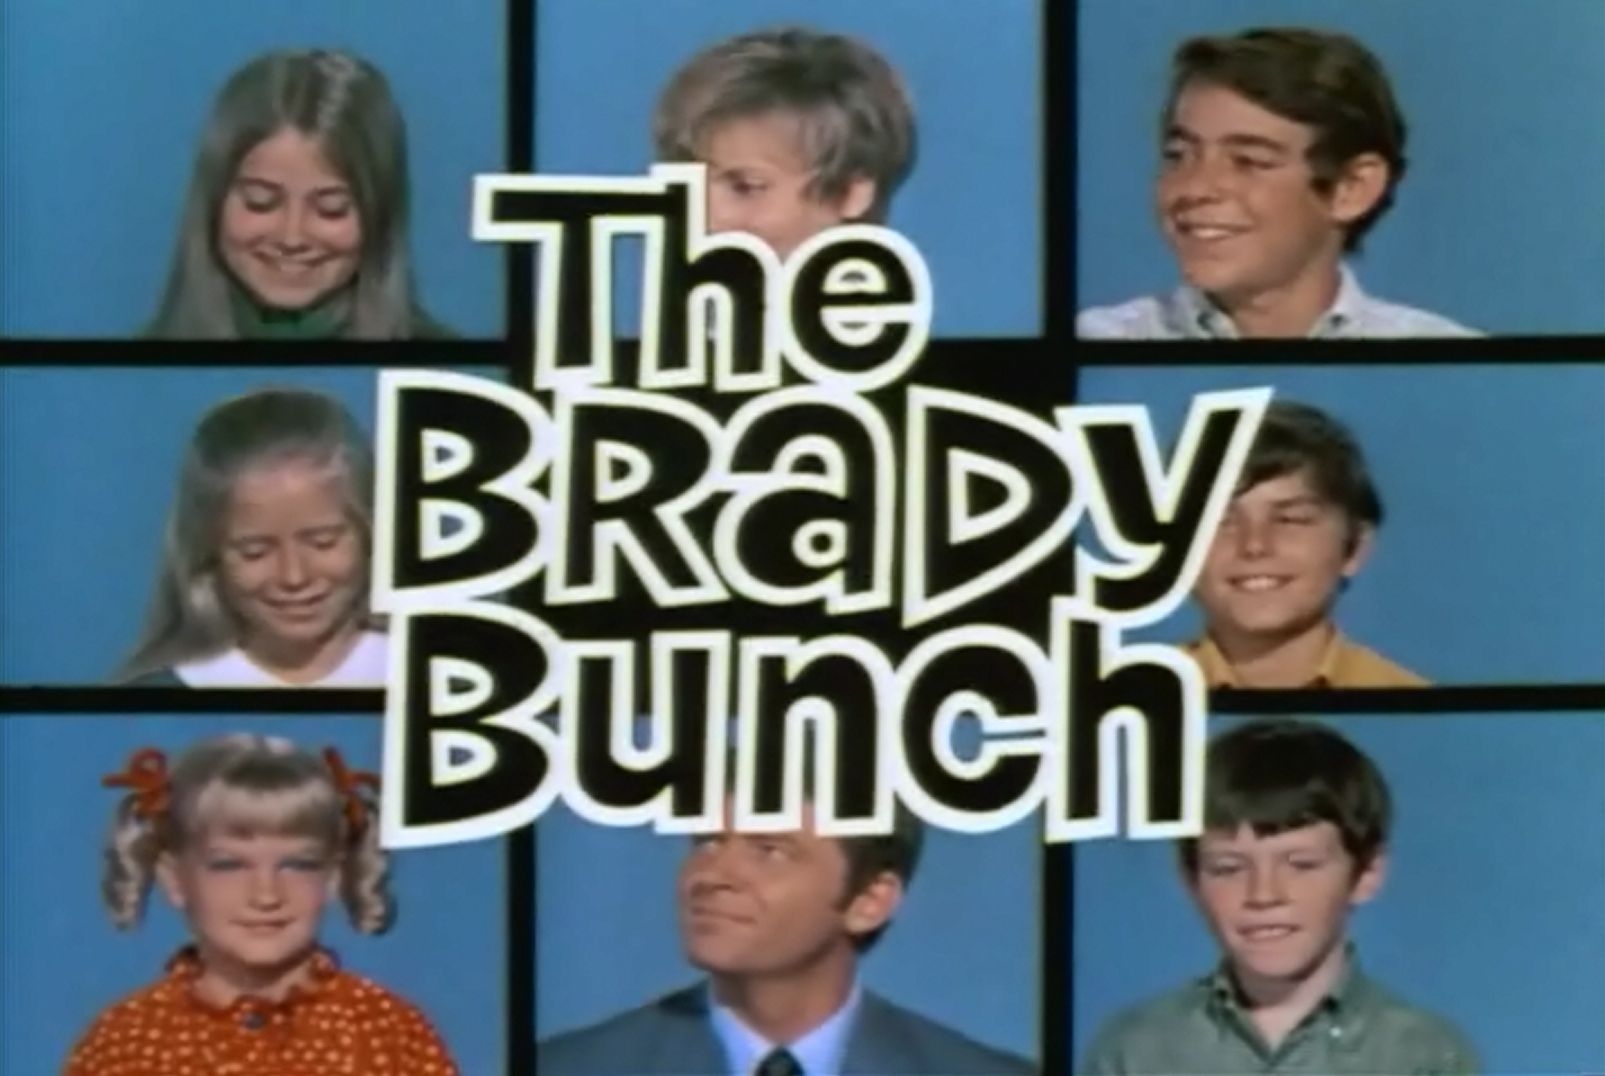
Just looking at the image <BAM!> - now the theme song is stuck in your head, right? In this tutorial, we'll walk through how to re-create the iconic Brady Bunch intro video with FFmpeg.
Doug Sillars
September 15, 2021

🎶🎶🎶 Now here's the story... 🎶🎶🎶
As a child, the Brady Bunch was a regular part of my afternoon. It wasn't a new show, but every day after school there were cartoons and the Brady Bunch reruns on TV.
For those not from the USA (it was interesting that at api.video, it was just the Americans who knew the show), the story revolves around a single dad with 3 boys who marries a single mom with 3 girls. They hired a wacky housekeeper, and together the nine characters were the Brady Bunch. Years of laugh track hijinks followed their adventures.
The opening
The image above is a short GIF, but each character is looking around and smiling at the other members of the Brady clan. It's an iconic US television look, and I thought it would be fun to re-create a "Brady Bunch" video using FFMPEG to interlace 9 different videos into that familiar 9-grid pattern.
A huge Thank You! to Anne-Sophie and Cedric for recording all of our colleagues (and of course to my api.video colleagues for going along with this fun project).
Starting my FFMPEG command
After pitching this idea to the team, I woke up a few days later to a number of videos shared in a Slack channel. Woo hoo! Here we go!
When composing an FFMPEG command, the first step is to input all of the files you will be using. We'll do a -filter_complex to resize and build the video layout, and then output the video in done.mp4.
ffmpeg -i sorin.mp4 -i olia.mp4	-i maria.mp4  -i josephine.mp4
-i yohann.mp4 -i anne-sophie.mp4 -i brady_erikka.mov
-i cedric.mov -i pierre.mov  -i T3.mov  -i fancy.mov
-i romain.mov	-i jb.mov
-filter_complex '<we'll get here in a second>'
done.mp4
For the filter complex, we'll generate a 4K video. 4K is 3840x2160, and is super convenient as it allows us to place 9 1280x720 videos into the "Brady grid":
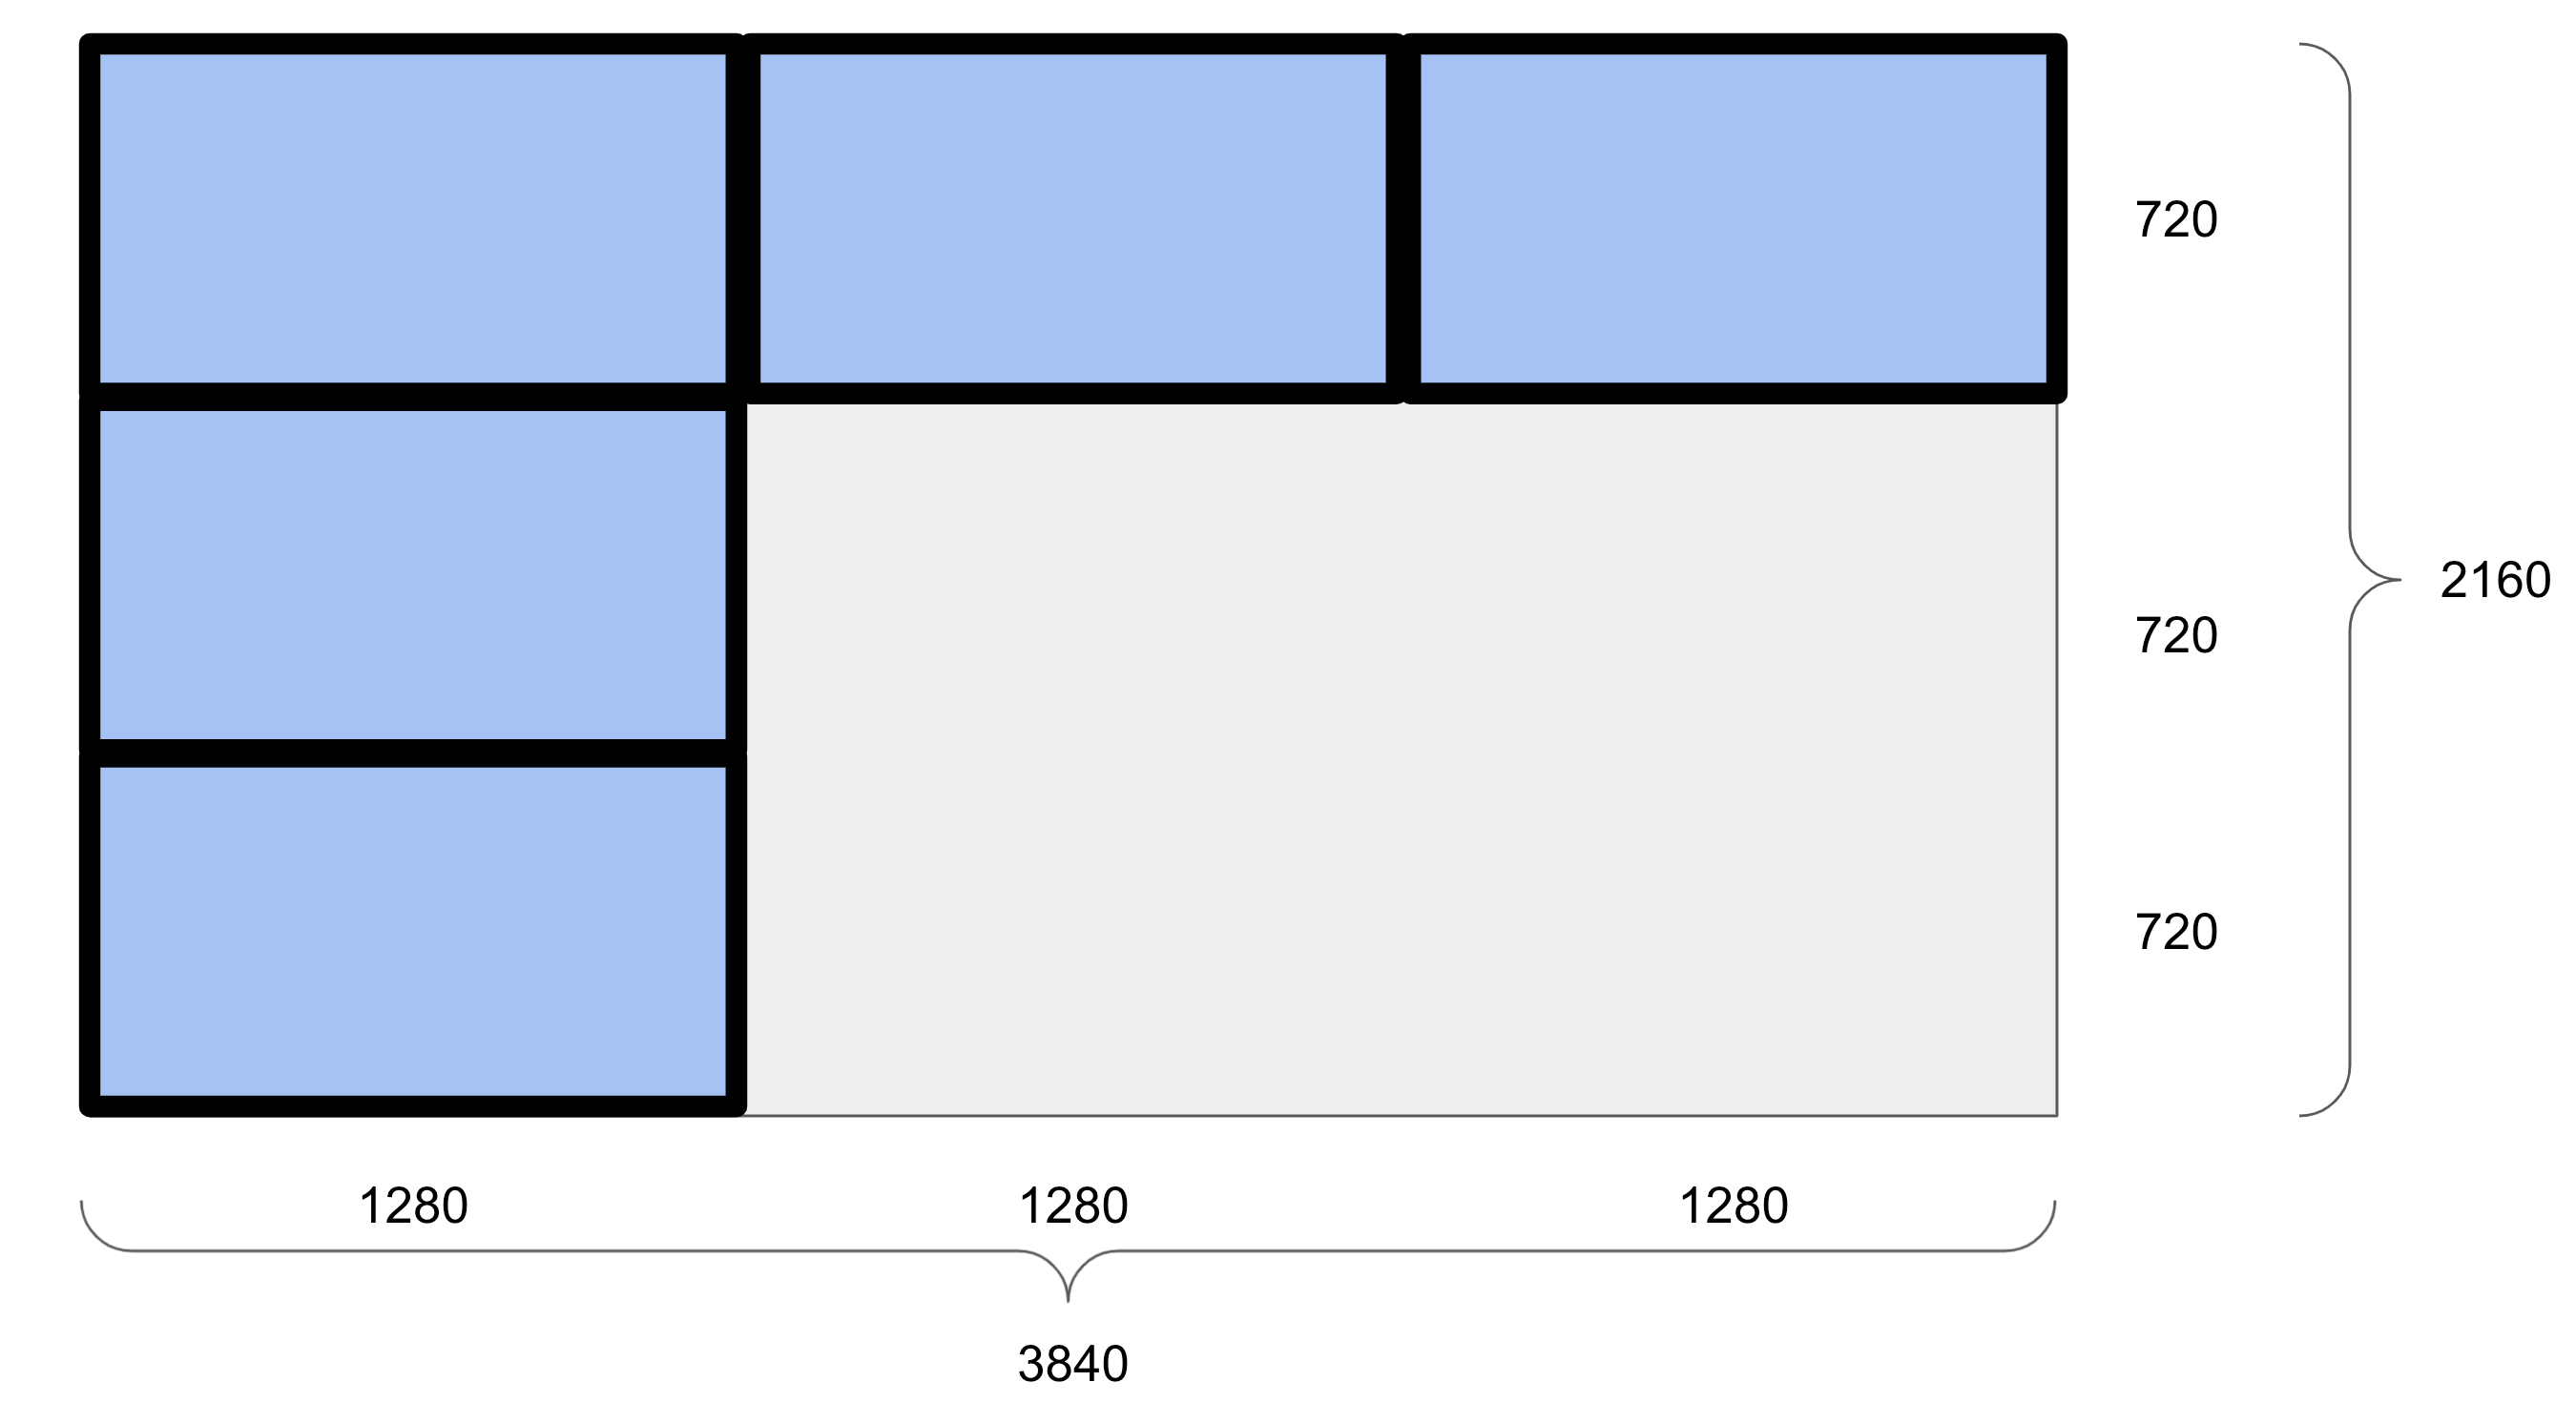
So, each of the videos needs to be 1280x720. And here is where we came across our first complication. Half of the videos were recorded in landscape mode:
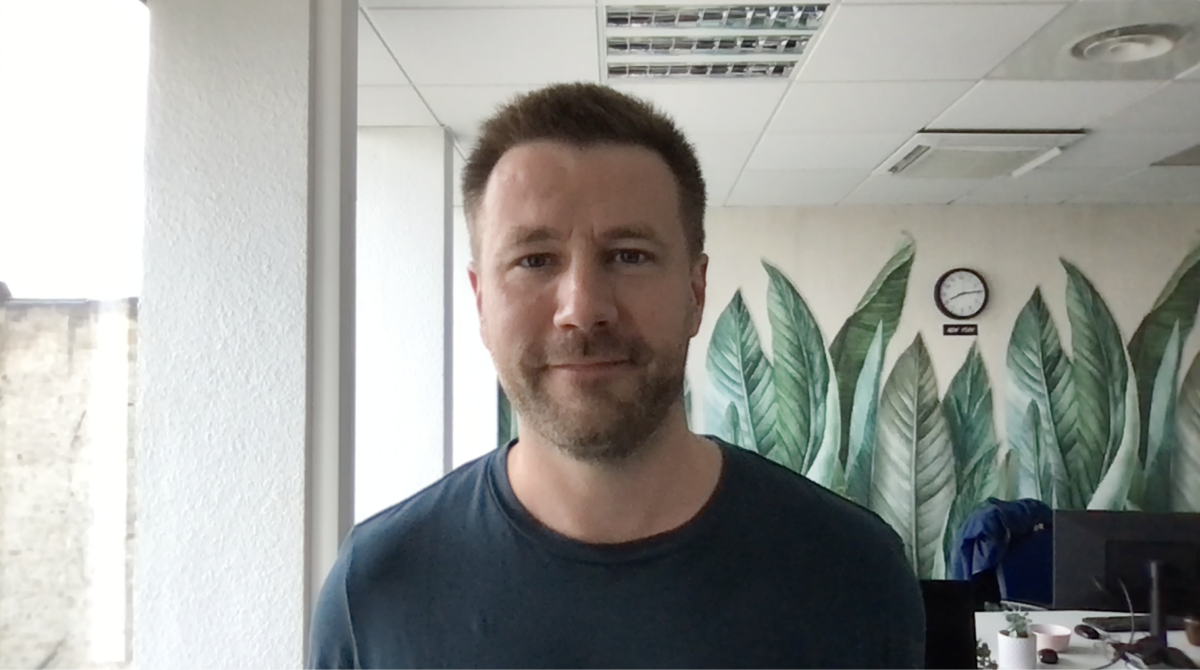
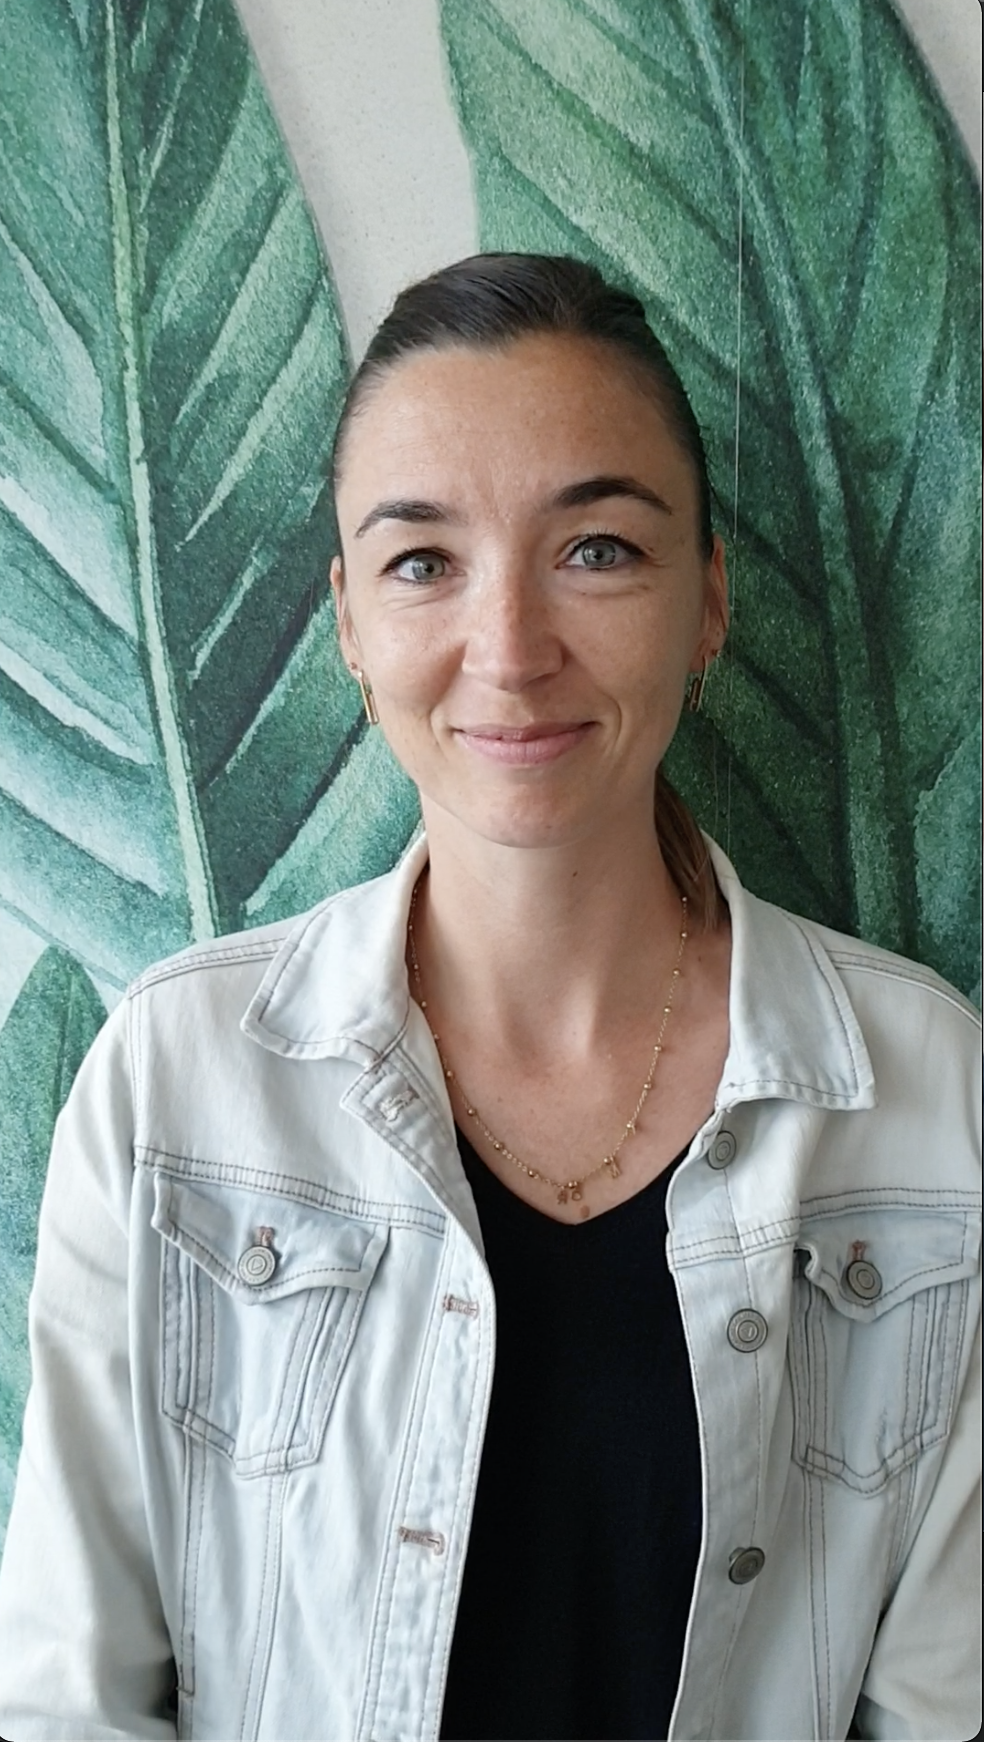
..but half were recorded in portrait mode....
The landsacpe videos are all the right 16:9 proportion - but are 1080p - so will have to be rescaled to 1280x720.
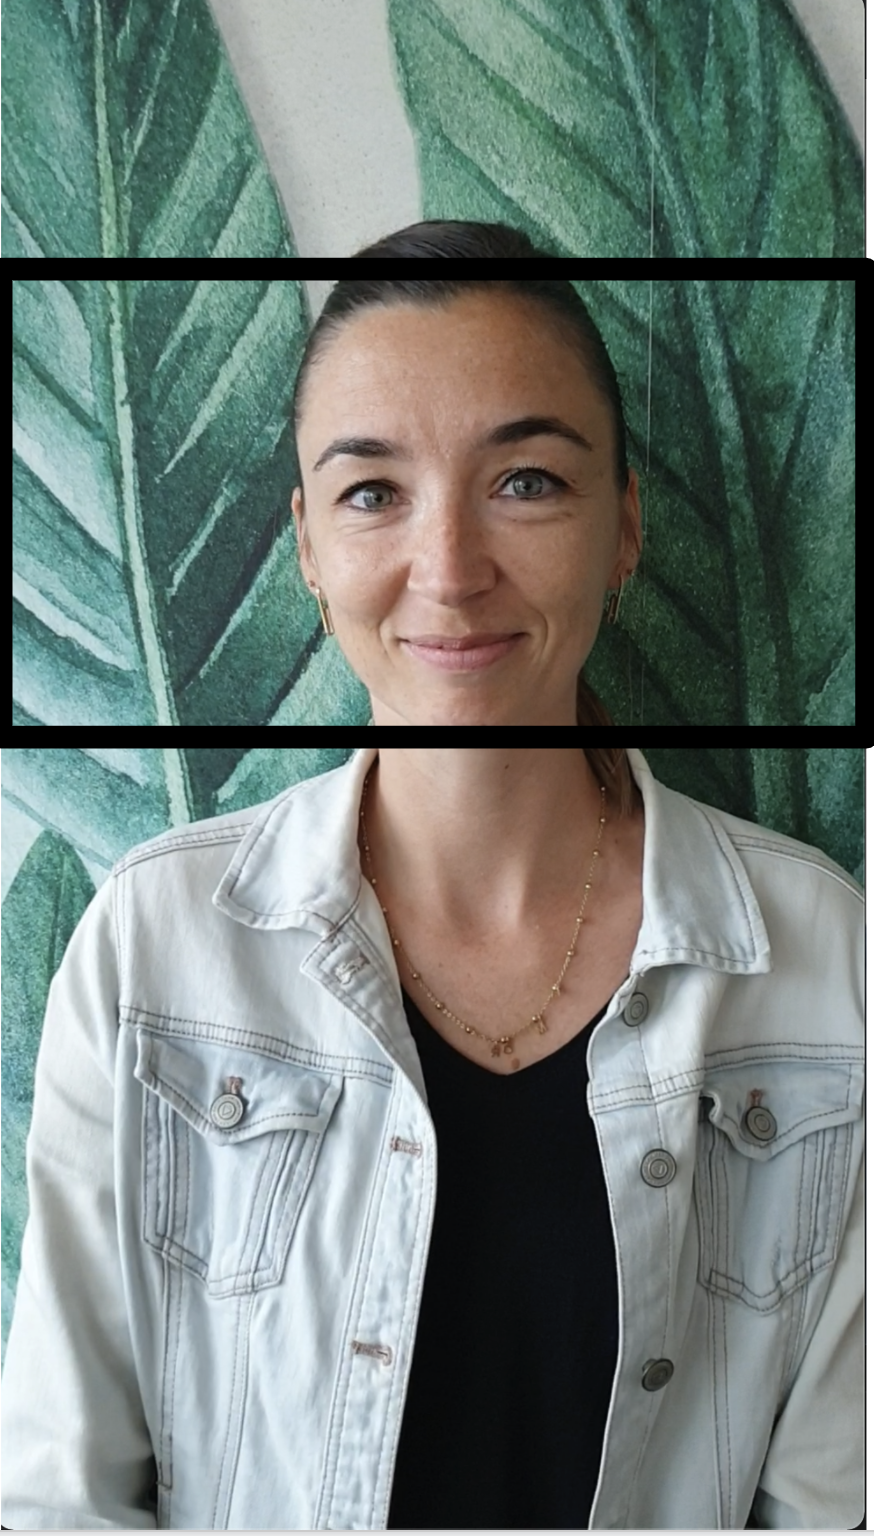
The portrait videos are 1080x1920, so we'll have to do a crop,and then slightly upscale them. But we're using FFMPEG, so this will be a snap!
Building the palette
We want our video to be 4k, so we first input a video and resize it to 4K. It doesn't matter which video, since we will draw on top of it. I'm using the center video - the 5th video (index 4) as the background. It is resized to 4K, and named main.
[4]scale=3840:2160[main]
Cropping inside the filter_complex
For each video, we can build something like this:
[0:v]crop=in_w:in_w*9/16:0:in_h*0.2,scale=1280:720[0];
Let's walk through what this command does:
[0:v] - grab the video from input 0 (thats sorin.mp4).
crop=in_w:in_w*9/16:0:in_h*0.2 - the crop command, which has 4 parameters video width: video height:x start: y start
- video width: in_w - take the width of the input video
- video height: in_w*9/16 - take the width, and multiply by 9/16 to keep the video in the 9:16 format. (this will do nothing to the landscape videos, but will crop the portrait ones).
- x_start: 0. Grab from the far left of the video
- y_start: in_h*0.2 Get the height of the video, and begin the crop 20% down. The percentage can be modified slightly on each video - as some of our colleagues are taller than others.
Now we've cropped each video. The landscape videos will be mostly unchanged, but the portrait videos will be cropped into a landscape view around the face.
scale=1280:720[0] Resize the 16:9 video to 720p.
[0]. Rename this modified video [0]. This is a variable that we can call later for placement.
We have to do this for each video, so our -filter_complex begins growing:
[4]scale=3840:2160[main];
[0:v]crop=in_w:in_w*9/16:0:in_h*0.2,scale=1280:720[0];
[1:v]crop=in_w:in_w*9/16:0:in_h*0.1,scale=1280:720[1];
[2:v]crop=in_w:in_w*9/16:0:in_h*0.2,scale=1280:720[2];
[3:v]crop=in_w:in_w*9/16:0:in_h*0.2,scale=1280:720[3];
[4:v]crop=in_w:in_w*9/16:0:in_h*0.1,scale=1280:720[4];
[5:v]crop=in_w:in_w*9/16:0:in_h*0.2,scale=1280:720[5];
[6:v]crop=in_w:in_w*9/16:0:in_h*0.2,scale=1280:720[6];
[7:v]crop=in_w:in_w*9/16:0:in_h*0.1,scale=1280:720[7];
[8:v]crop=in_w:in_w*9/16:0:in_h*0.1,scale=1280:720[8];
[9:v]crop=in_w:in_w*9/16:0:in_h*0.1,scale=1280:720[9];
[10:v]crop=in_w:in_w*9/16:0:in_h*0.1,scale=1280:720[10];
[11:v]crop=in_w:in_w*9/16:0:in_h*0.1,scale=1280:720[11];
[12:v]crop=in_w:in_w*9/16:0:in_h*0.1,scale=1280:720[12];
[13:v]crop=in_w:in_w*9/16:0:in_h*0.1,scale=1280:720[13];
[14:v]crop=in_w:in_w*9/16:0:in_h*0.2,scale=1280:720[14];
[15:v]crop=in_w:in_w*9/16:0:in_h*0.2,scale=1280:720[15]
It took a few tests to lay out each person the way I wanted - mostly changing the in_h multiplier to properly center the face.
Layout of the videos
The next bit of the filter_complex lays out each of the videos into the grid.
[main][0]overlay=0:0[main0]
This tells FFMPEG to take the "main" 4K video, and overlay video "0" at (0,0). Rename this intermediate video "main0". We now repeat this for each video, updating the variables and the (x,y) coordinates for each video.
Only one video will remain at the center (index 4) - the video of our CEO Cedric.
[main][0]overlay=0:0[main0];
[main0][1]overlay=1280:0[main1];
[main1][2]overlay=2560:0[main2];
[main2][3]overlay=0:720[main3];
[main3][4]overlay=1280:720[main4];
[main4][5]overlay=2560:720[main5];
[main5][6]overlay=0:1440[main6];
[main6][7]overlay=1280:1440[main7];
[main7][8]overlay=2560:1440[main8];
[main8][9]overlay=0:0[main9];
[main9][10]overlay=1280:0[main10];
[main10][11]overlay=2560:0[main11];
[main11][12]overlay=0:720[main12];
[main12][13]overlay=2560:720[main13];
[main13][14]overlay=0:1440[main14];
[main14][15]overlay=1280:1440[main15];
[main15][16]overlay=2560:1440
Now, those of you with keen eyes will notice that video 9 will sit on top of video 0 (10 on top of 1, etc.). I have more videos to add to the grid of 9 than places for them. We'll fix that in our next step.
Video timings
Each video has a slightly different length. When a video reaches an end, the video freezes, while the rest continue playing. I'd like all the videos to move for the entire clip. Looking at all of them, the shortest video is 9 seconds long. (Thanks to Pierre for defining our video's length 🤣).
We want each video to be 9 seconds long. We can fix this by changing the input parameter for each video:
-t 9 -i doug.mp4
-t 9 says, "grab only the first 9 seconds of doug.mp4." Adding this to each video - now the overall video is exactly 9 seconds long!
More video timing - desynchronizing the movements
Having watched these videos a lot, everyone moved their heads in the same pattern of motions, at approximately the same rate. When they are all combined into one video, the results were eerily robotic. Usually, you want all your videos in sync, but in this case, we want to actually artificially de-synchronize our videos a bit.
To do this, we can grab 9 seconds of each video - but from a different start point for each video:
-ss 5 -t 9 -i olia.mp4
-ss 4 start offset of 4 seconds
-t 9 9 seconds of video
This command tells FFMpeg: "input 9 seconds of Olia.mp4, starting at 5 seconds into the video,". As long as we are careful and the SS + t values are not longer than the video's length, we'll be fine (I created a spreadsheet). So we input different -ss values for each video.
Timing part 3: More than 9 videos
As noted, we have more than 9 videos. We could have just stopped at 9, but I wanted to include everyone. The easiest way to do that is to have two rounds of people in the 9 grid. We'll put Cedric in the middle for 18 seconds (his video was over 20s, so we are ok), and array 2 sets of 8 people around him.
 -ss 5 -t 9 -i erikka.mp4

 -itsoffset 9 -t 9 -i romain.mov
Erikka's video will be 9 seconds long (starting at time 5 from her video), and will be inserted into the final video at t=0. Romain's video will be 9 seconds long as well, but the -itsoffset 9 parameter says "Begin adding this video 9 seconds into the video."
So the result is Erikka is on the video for time 0-9s, and at t=9, Romain's video replaces her for t=9-18.
At this point, I'm super happy with the video. but it is just missing something... and that is (of course) a text overlay.
The api.video Bunch
There is a free Brady Bunch font. I downloaded it, and placed it in the same directory as the videos. When you add text, you specify the location, the size and the font. I'll have 3 lines of text. The comma seperate each line, but for readability, I'll add a few lines between each one:
drawtext=enable:fontfile=BradBunR.ttf:fontsize=400:borderw=10:bordercolor=white:text='The':x=(3840)/2-200:y=(2160)/2-600,

drawtext=enable:fontfile=BradBunR.ttf:fontsize=400:borderw=10:bordercolor=white:text='api.video':x=(3840)/2-400:y=(2160)/2-400,

drawtext=enable:fontfile=BradBunR.ttf:fontsize=400:borderw=10:bordercolor=white:text='Bunch':x=(3840)/2-200:y=(2160)/2+200
drawtext=enableTurn on the drawing (I guess)fontfile=BradBunR.ttfLoad in the Brady Bunch font!fontsize=400It is a 4K video, so we can go pretty large.borderw=10:bordercolor=whiteThe default font color is black, but we want a nice retro white border around it.text='api.video'The text to output.x=(3840)/2-400:y=(2160)/2-400Finally the (x,y) coordinates to start the text. This took some trial and error to get the locations in the right spot, but I'm pretty happy with the result:
The full FFMPEG command
We've walked through all the steps used to create the command, but we cannot avoid the inevitable: we have to show the full FFMPEG command. It follows the basic premise above:
- Input all the videos (with time = 9, start offsets and playback offsets)
- filter all the videos
- resize and or crop all the videos
- overlay them all on a 4K background
- add the text
- output the video
ffmpeg -ss 10 -t 9 -i sorin.mp4 -ss 5 -t 9 -i olia.mp4 -ss 4 -t 9 -i maria.mp4 -ss 5 -t 9 -i josephine.mp4 -ss 2 -t 18 -i cedric.mov -ss 1 -t 9 -i yohann.mp4 -ss 6 -t 9 -i anne-sophie.mp4 -ss 2 -t 9 -i brady_erikka.mov -ss 0 -t 9 -i pierre.mov -itsoffset 9 -ss 3 -t 9 -i T3.mov -itsoffset 9 -ss 6 -t 9 -i fancy.mov -ss 0 -itsoffset 9 -t 9 -i romain.mov -itsoffset 9 -ss 11 -t 9 -i jb.mov -itsoffset 9 -ss 0 -t 9 -i doug.mp4 -itsoffset 9 -ss 0 -t 9 -i stephanie.mov -ss 10 -itsoffset 9 -t 9 -i sorin.mp4 -ss 5 -itsoffset 9 -t 9 -i olia.mp4 -filter_complex '[4]scale=3840:2160[main];[0:v]crop=in_w:in_w*9/16:0:in_h*0.2,scale=1280:720[0];[1:v]crop=in_w:in_w*9/16:0:in_h*0.1,scale=1280:720[1];[2:v]crop=in_w:in_w*9/16:0:in_h*0.2,scale=1280:720[2];[3:v]crop=in_w:in_w*9/16:0:in_h*0.2,scale=1280:720[3];[4:v]crop=in_w:in_w*9/16:0:in_h*0.1,scale=1280:720[4];[5:v]crop=in_w:in_w*9/16:0:in_h*0.2,scale=1280:720[5];[6:v]crop=in_w:in_w*9/16:0:in_h*0.2,scale=1280:720[6];[7:v]crop=in_w:in_w*9/16:0:in_h*0.1,scale=1280:720[7];[8:v]crop=in_w:in_w*9/16:0:in_h*0.1,scale=1280:720[8];[9:v]crop=in_w:in_w*9/16:0:in_h*0.1,scale=1280:720[9];[10:v]crop=in_w:in_w*9/16:0:in_h*0.1,scale=1280:720[10];[11:v]crop=in_w:in_w*9/16:0:in_h*0.1,scale=1280:720[11];[12:v]crop=in_w:in_w*9/16:0:in_h*0.1,scale=1280:720[12];[13:v]crop=in_w:in_w*9/16:0:in_h*0.1,scale=1280:720[13];[14:v]crop=in_w:in_w*9/16:0:in_h*0.2,scale=1280:720[14];[15:v]crop=in_w:in_w*9/16:0:in_h*0.2,scale=1280:720[15];[main][0]overlay=0:0[main0];[main0][1]overlay=1280:0[main1];[main1][2]overlay=2560:0[main2];[main2][3]overlay=0:720[main3];[main3][4]overlay=1280:720[main4];[main4][5]overlay=2560:720[main5];[main5][6]overlay=0:1440[main6];[main6][7]overlay=1280:1440[main7];[main7][8]overlay=2560:1440[main8];[main8][9]overlay=0:0[main9];[main9][10]overlay=1280:0[main10];[main10][11]overlay=2560:0[main11];[main11][12]overlay=0:720[main12];[main12][13]overlay=2560:720[main13];[main13][14]overlay=0:1440[main14];[main14][15]overlay=1280:1440[main15];[main15][16]overlay=2560:1440[finalnotext];[finalnotext]drawtext=enable:fontfile=BradBunR.ttf:fontsize=400:borderw=10:bordercolor=white:text='The':x=(3840)/2-200:y=(2160)/2-600,drawtext=enable:fontfile=BradBunR.ttf:fontsize=400:borderw=10:bordercolor=white:text='api.video':x=(3840)/2-400:y=(2160)/2-400,drawtext=enable:fontfile=BradBunR.ttf:fontsize=400:borderw=10:bordercolor=white:text='Bunch':x=(3840)/2-200:y=(2160)/2+200' apibunch.mp4
Yeah, it's a long one. But the results speak for themselves - a fun video showing off the api.video team!
Conclusion
Install FFMPEG! Get 9 friends to film a video - and create your own "The
YOU MIGHT ALSO LIKE
LATEST ARTICLES

Tutorials · 8 min read
What is a webhook and how to use webhooks for real-time video management
Answer critical questions like what are webhooks, how they work, and how you can use them for video management.
api.video · September 12, 2024
Tutorials · 4 min read
How to build AI facial expression detection into your videos with React
Learn how to add AI facial expression detection to your videos using one of Javascript's powerful libraries, React.
Yohann Martzolff · June 26, 2024
Tutorials · 4 min read
How to integrate AI facial expression detection to control your video – Javascript
Learn how to add AI facial expression detection to your videos using Javascript.
Yohann Martzolff · June 25, 2024
Try out more than 80 features for free
Access all the features for as long as you need.
No commitment or credit card required
Video API, simplified
Fully customizable API to manage everything video. From encoding to delivery, in minutes.
Video API, simplified
Fully customizable API to manage everything video. From encoding to delivery, in minutes.
Built for Speed
The fastest video encoding platform. Serve your users globally with 140+ points of presence.
Built for Speed
The fastest video encoding platform. Serve your users globally with 140+ points of presence.
Let end-users upload videos
Finally, an API that allows your end-users to upload videos and start live streams in a few clicks.
Let end-users upload videos
Finally, an API that allows your end-users to upload videos and start live streams in a few clicks.
Affordable
Volume discounts and usage-based pricing to ensure you don’t exceed your budget.
Affordable
Volume discounts and usage-based pricing to ensure you don’t exceed your budget.